


Enter Your Pools Dimensions
Enter your pool dimensions below Remember! you do not need to enter your pool depth as we off the unique advantage of the very best price on our liners regardless of your swimming pools depth.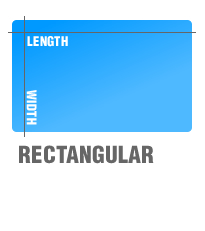

30 Thou 35 Thou
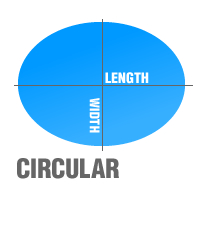
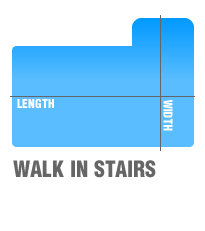
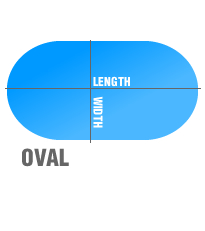
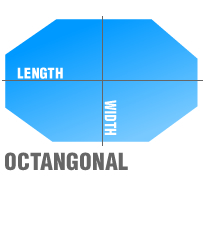
Pool's length in metres:
Pool's width in metres:
Pool's length in feet:
Feet: Inches:
Pool's width in feet:
Feet: Inches:
£0.00
£0.00


- 35% off
- No Depth Charge
- Free Tile Band in Patterned Liners
- Free Fittings Replacement Kit
To ensure your specifications are absolutly correct, download our PDF order form.

Common Queries Answered
Common Queries Answered Please take note of the following before placing any liner order. In a chemically balanced pool, liners will offer good service at temperatures of up to 32degC. Temperatures in excess of this could considerably reduce the life span of the liner. Whilst every effort will be made during manufacture, it is not always possible to match patterns along the seam due to the high stretch factor of materials and the complexity of some patterns - end users should be aware of this. If you have a step section in the pool, please let us know at the time of order, we will then, where possible, place the closing wall seam central to this point in order that the seam is trimmed out during installation. Many darker materials are printed on a white background. It is therefore common to have a fine white line along the edge of the seam due to the flow of material as they fuse together. This is not a fault. Installation of a liner should not be attempted in temperatures below 10degC as the elasticity of the liner will be greatly reduced. If you are not happy with the initial fit of the liner, stop the installation and call us to discuss. DO NOT CUT THE LINER. Cutting of the liner will be seen as acceptance of the product.
Free Fittings Replacement Kit
All Certikin Domestic Liner orders will receive a FREE OF CHARGE Certikin fittings kit* worth £193.15!
FOC Kit contains
- 2nr. Wide Angle Extension Throat liner kit (inc. cover, plate, flange & screws)
- 3nr. Inlet liner kit (inc. flange, gasket, eyeball & screws)
- 1nr. High velocity main drain kit (inc. lid, flange, gasket & screws)
- 1nr. Light liner kit (inc. facia ring, flange, gasket & screws)
- 1n. HD54 Suction grille
- Sun Sorb scum sponge
* the kit contents can in no way be modified, changed & we will not swap items for another of equal or less value. The kit will be sent at the same time as the liner but may possibly come via a separate courier. Excludes commercial, onsite & spray liners.
Fitting the Liner Lock
If the top of the blocks are not absolutely flat and level, this must be adjusted before the liner lock is fitted, and if necessary a sand/cement screed should be accurately levelled around the top of the wall. The coping is laid immediately on top of the liner lock, and if this is not perectly level the undulation are very easily seen under the coping which can spoil the look of an otherwise perfect pool.
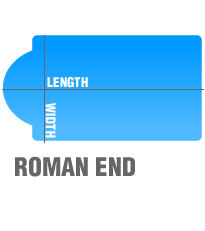
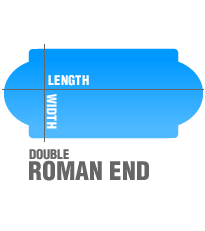
The linerlock plastic extrusion can now be fitted to the top of the pool wall using three quarter inch masonry nails, at approximately 18" centres, and nailed at the back of the flat linerlock section to avoid the possibility of chipping off a part of the top block. Start by fixing the four preformed linerlock corners, then cut and fix the straight lengths making sure that the edge is flush with the inside wall. Where a Roman End or Rectangular End is fitted the linerlock should overlap the fibreglass unit up to the liner edge of the faceplate. Drill and fix with a self tapping screw at this point.
Preparing for the Vycon Liner
Firstly, inspect the whole interior of the pool and knock off any lumps of cement or similar and remove. This using a soft broom, brush out the entire pool leaving it completely clean of all debris, finally using a vacuum cleaner to complete this very necessary task. Fit the inside of the underwater light by pushing the cable up the conduit from the inside of the pool to the deck box and then coil the remaining cable around the light itself which is left inside the niche (in order that the light can always be removed underwater to replace the bulb).
Repair any small defects in the floor screed with a mixture of neat cement and water and make certain that all the faces of the pool fittings and underwater light(s), if fitted, are completely clean and all the screw holes clear. (Also remove wedge of newspaper used to block the pipe work in the main drain.)
Preparing the Vycon Pool Liner Fittings
After cleaning the fittings and making sure all the holes are clear, all the gaskets should be fitted. The inlet fittings and underwater lights have self adhesive gaskets. Peel off all protective paper and carefully fix to the fittings. In the case of the main drain and skimmer, the gaskets are not fitted until the liner is installed
Fitting the Pool Liner
ll Vycon hopper liners are made slightly smaller than the pool, so that they stretch into shape without any wrinkles or creases. If possible the liner should be fitted on a warm sunny day, otherwise leave the liner over night in a warm room to become pliable. The liner should be carefully carried into the pool and laid down in the centre of the shallow end floor. A label will be found indicating the deep and shallow end and the liner should be unrolled down the length of the pool and unfolded. Welded to the top edge of the liner is the linerlock beading which will clip into the linerlock already secured around the top of the pool walls. DURING THE LINER FIXING EVERYONE IN THE POOL MUST WEAR CLEAN SOFT SHOES TO AVOID DAMAGING THE LINER.
Start in one shallow end corner by identifying the exact centre of the corner at floor level. With your foot push this into the corner of the pool. Keeping the pressure on this corner, lift the liner wall and press the beading into the linerlock until the liner is held in position. Fix the next corner and continue around the pool. The liner is now fixed in its basic position. If a Roman End or Rectangular End is fitted, a special blanking board should be fitted cross the opening into the steps. This can be made of hardboard, or thick cardboard, and should be 2'3" x 9'8" for a Roman End or 2'3" x 5'2" for a Rectangular End.
Sucking the Liner into place with a vacuum
The use of a vacuum cleaner to finally position the liner is extremely simple and guarantee the exact fit before any water is put into the pool or any of the fittings cut. At this stage, check the three pipes leading from the pool and seal off the open ends with masking tape. Fir the frame and lid onto the skimmer and tape up any gaps. A small fillet of cement at the back of the linerlock will be required to prevent any air getting underneath and ensure a complete vacuum.
Vacuum Cleaner
It is preferable to hire a commercial vacuum cleaner from your local plant hire company. The suction hose should be carefully pushed down behind the liner intil it is 6" from the bottom of the wall. This is best positioned approximately 1" from a hopper end corner after unclipping a small section of the liner beading from the linerlock. The gap around the hose will hae to be sealed with tape and the vacuum can now be switched on. After a few minutes the liner will be sucked back against the walls and floor, making it easy to check that the liner has been put in correctly, with all four corners in exactly the right place, the floor seams correctly fitting at the base of the walls. Do not worry if there is tension at the bottom of the walls, and the liner does not suck back completely, but there should be equal tension all round. If there are creases from the top of the wall to the floor seams, this indicates that the top of the liner has to be moved round a little; switch off the vacuum and adjust and the switch on the vacuum again. When satisfied that the liner is correct the main drain fitting can be cut and fitted.
Cutting the Main Drain
Take the main drain flange, gaskets, grille, screws also a Phillips screwdriver and knife down to the bottom of the hopper. The main drain can be easily felt through the liner, and each screw hole punctured with the point of the Philips screwdriver. Both gaskets are positioned under the flange, on top of the liner, and the eight screws are securely screwed home. It is best to screw these lightly first and then screw home the diagonally opposed screws until all are tight. Simply remove the liner material in the centre of the main drain with a sharp knife and fit the grille cover into position.
Cutting the Underwater Light Fitting
The underwater light fitting must NOT be fitted until the water level is immediately below the light. At this stage the 12 holes are easily located through the liner, and each should be pierced with a Philips screw driver. The faceplate should now be fitted and securely screwed tight, again tighten the diagonal opposed screws in rotation until firm. After the faceplate has been fitted, use a sharp knife and cut out the inner circle of liner. If in the future the bulb unit has to be changed this is easily carried out without lowering the water level. Undo the two securing screws, remove 'guts'. Uncoil surplus cable wound around light and lift unit onto the paving. The bulb can now be changed and the light refitted.
Cutting Roman End or Rectangular End Fitting
These step units have a gasket fixed when supplied which remains in position. Make sure the water level, approximately 9 is immediately below the bottom of the faceplate, locate the faceplate and secure the top screw on either side. Standing in the water barefoot, place the side of one foot against the bottom of step unit, and press the liner downward into the wall floor joint then secure the screw immediately above. Use this method on all the bottom row screws to ensure that when full the water pressure will not strech the liner further after screwing up the faceplate. In warm sunny weather with the liner pliable the liner will be probably sretch on its own accord, but in colder weather when the liner is not so pliable, the stretching procedure is essential. When the face plate has been securely screwe into place the blanking plate can be removed and the liner cut out with a sharp knife.
Cutting the Skimmer
Again, wait until the water level is immediately below the skimmer. Locate and puncture the 14 screw holes and cut out the inner rectangle of liner. There are two gaskets to fit in between the liner and the flange, which are easily located by pushing two screws in the top corners of the flange and pushing gaskets over the screws, then fixing flange and gaskets to the skimmer. Again screw up carefully and in rotation.
After the skimmer faceplate and gaskets have been fitted, the pool filling can be continued, until the water level is half way up the skimmer mouth.
The next step is to lay the Vycon non slip coping round the pool. First of all mix up a grout of cement and water, and spread on top of the pool walls, this ensures a good bond. Mix up a 6:1 mixture of sand and cement, and level around the top of the pool up to the height, and level with, the top of the linerlock.
This must be perfectly flat and level, as the coping stones are bedded directly onto this screed. The four corner coping stones are the first to be positioned after pasting the back of these corner coping with a thick slurry of white cement and water. The pasted corners are positioned on the corners so that the flat base lays on top of the interlock, fully covering it and the face is flush with the inside edge of the pool wall. When the four corner stones are in position a taut line can be stretched along the front edge to provide a perfect straight line for positioning the coping.
As there is some slight deviation in thickness of the coping, some coping may require a little thicker pasting to make a perfect top line. The last coping in each line will probably require cutting in length which is easily and quickly carried out with a carborundum disc cutter. A gap should be left between the stones to allow for pointing. The pointing mixture of 1 part silver san to one part of white cement should be carefully trowelled into the gaps wiping off any surplus from the coping stones. The pointing mixture should be of putty like consistency and not too wet.
Pool Liner Tile Band Options
As well as Liner pattern options, there a number of additional options to enahnce your pool liner.
TB+/TBS Options
Recent developments in lacquering have provided vinyl manufacturers with the ability to offer superior multi-lacquer finishes to strengthen the area of the pool which is prone to the strongest levels of attack - the waterline.Tile bands with multiple layers of lacquer have proven themselves under test to show superior resistance to stains, abrasions and scratches, as well as delaying the migration of plasticisers from the vinyl, the process of which results in the vinyl going brittle. The core body of the liner (walls and floor) has always only contained a single layer of lacquer and this is still the case. Tile bands had also previously been coated in such away and part of the standard range is still available.
Use the following guide to select the desired pattern and quality:
TB+ (Premium product Tile Band+ offers the benefits of multiple layers of lacquer at the waterline).
TBS (The standard product with a single layer of lacquer which was previously the only option).
Multi-Lacquered Tile Bands
The premium quality of multi-lacquered tile bands has been established to increase durability and presentation of the water line area over the life of the liner. As such, extensive testing has been carried out on this new product to highlight the performance benefits. The following images show results following extensive testing aimed at showing improved resistance to abrasion, scratching and staining. Please see page 169 for the range of tile bands available in this option and page 168 for Certikins new Ultra Liner which combines the new multi-lacquered tile bands with a tougher liner body.
Liner Wall and Floor Options
Liner Wall and Floor Options
Liner Motif Options
Mosaine pool motifs bring a unique and new approach to decorating a liner pool. Applicable to standard or re-enforced pool linings, Mosaine motifs are available in a wide variety of designs,images and colours and also offer the opportunity to allow your own unique design to be created. Manufactured onto high quality commercial grade PVC, each design is hand made and coloured using a unique colour injection process which creates the effect of a mosaic applied motif. The finished products come in an array of sizes and styles and can be welded or glue to the lined pool (once the lining is in position) - they are also available as a self-adhesive option for a quick, easy installation (upon reinforced linings only). All versions require the motif edge to be sealed with a seam sealing liquid.
ASK FOR DETAILS ON THE FULL RANGE: The examples shown are just a small selection from the many available.The range includes an array of aquatic related designs such as mermaids, divers, sharks, rays, penguins, multiple styles of dolphins, fish, etc, as well as many asymmetric designs, compass points and traditional symbols. Sizes range from approx 25cm x 25cm up to lengths of 200cm and widths of up to 180cm. The Mosaine range also includes borders, numerals, definition lines and decorative patch kits.